Overview
Currently, Storlets must be written in Java. Writing a Storlet involves implementing a single method interface and following some simple rules and best practices described below.
Once the Storlet is written and tested it can be uploaded as an object to a designated container (called ‘storlet’ by default). In addition in case the Storlet is dependent on some Java library, that library can be uploaded as a dependency of the Storlet. It is assumed that Storlet dependencies are small (on the order of few MBs), heavier dependencies should be part of the Docker image. We describe below how to deploy a storlet and its dependencies.
Once uploaded, the Storlet can be invoked in several ways (depending on how the Storlet is written):
- As part of a GET, where the object appearing in the GET request is the storlet’s input and the response to the GET request is the storlet’s output. The Storlet is also provided with the object user’s metadata, and can output user metadata.
- As part of a PUT, where the request body is the storlet’s input, and the actual object saved in Swift is the storlet’s output. The object being written to the store is taken from the URI of the user’s PUT request. As with the GET case, the Storlet is provided with the user metadata (extracted from the request headers) and can output user metadata.
To write a storlet you will need the SCommon.jar which is being built as part of the Storlets build process (see <https://github.com/openstack/storlets/blob/master/doc/source/dev_and_test_guide.rst>). Import the .jar to a Java project in Eclipse and implement the com.ibm.storlet.common.IStorlet interface. The interface has a single method that looks like this:
public void invoke(ArrayList<StorletInputStream> inStreams,
                   ArrayList<StorletOutputStream> outStreams,
                   Map<String,String> parameters, StorletLogger logger) throws StorletException;
Here is a class diagram illustrating the classes involved in the above API.
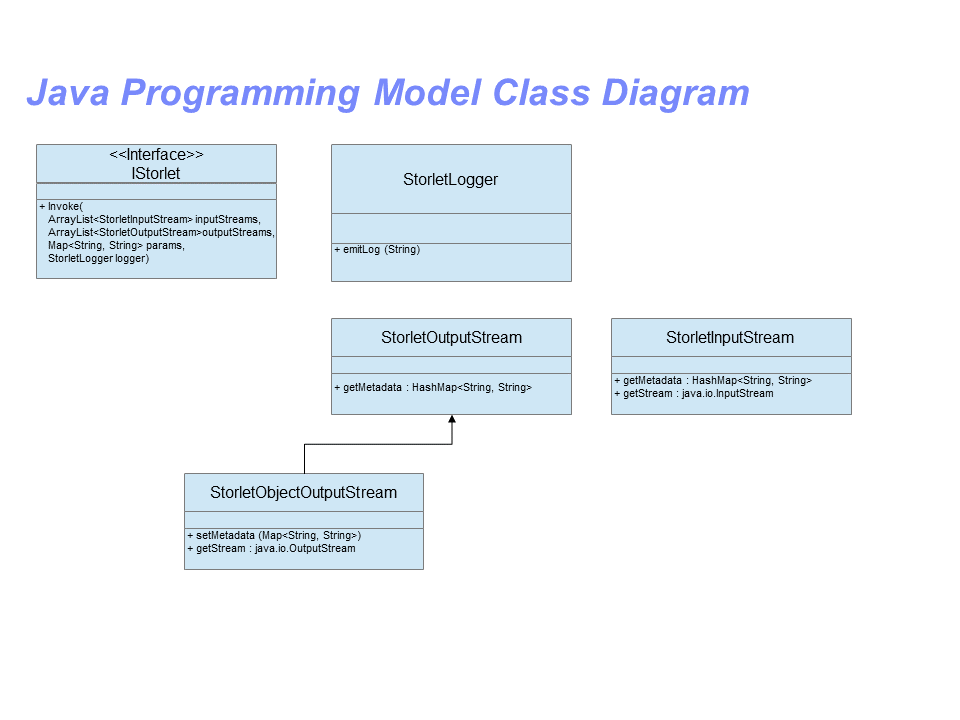
- The StorleInputStream is used to stream object’s data into the storlet. An instance of the class is provided whenever the Storlet gets an object as an input. Practically, it is used in the GET and PUT scenarios to stream in the object’s data and metadata. To consume the data call getStream() to get a java.io.InputStream on which you can just read(). To consume the metadata call the getMetadata() method.
- The StorleOutputStream is a base class for the StorletObjectOutputStream. The actual instance received by the storlet will always be StorletObjectOutputStream, the base class serves for a type of invocation that was removed for the interest of code simplicity.
- StorletObjectOutputStream. In the PUT and GET scenarios the storlet is
called with an instance of this class.
- Use the setMetadata method to set the Object’s metadata.
- Use getStream to get a java.io.OutputStream on which you can just write() the content of the object.
- Notice that setMetadata must be called. Also it must be called before writing the data. Additional guidelines on using StorletObjectOutputStream are given below.
- StorletLogger. The StorletLogger class supports a single method called emitLog, and accepts only String type. Each invocation of the storlet would result in a newly created object that contains the emitted logs. This object is located in a designated container called storletlog by default, and will carry the name <storlet_name>.log. Creating an object containing the logs per request has its overhead. Thus, the actual creation of the logs object is controlled by a header supplied during storlet invocation. More information is given in <https://github.com/openstack/storlets/blob/master/doc/source/invoking_storlets.rst>
When invoked via the Swift GET REST API the invoke method will be called as follows:
- The inStreams array would include a single element of type StorleInputStream representing the object appearing in the request’s URI.
- The outStreams would include a single element of type StorleObjectOutputStream representing the response returned to the user. Anything written to the output stream is effectively written to the response body returned to the user’s GET request.
- The parameters map includes execution parameters sent. These parameters can be specified in the storlet execution request. See <https://github.com/openstack/storlets/blob/master/doc/source/invoking_storlets.rst> IMPORTANT: Do not use parameters that start with ‘storlet_’ these are kept for system parameters that the storlet can use.
- A StorletLogger instance.
When invoked via the Swift PUT REST API , the invoke method will be called as follows:
- The inStreams array would include a single element of type StorleInputStream representing the object to read.
- The outStreams would include a single element which is an instance of StorletObjectOutputStream. Metadata and data written using this object will make it to the store, under the name provided in the original request URI.
- The parameters, and StorletLogger as in the GET call.
Storlet Writing Guidelines
Below are some guidelines to writing a Storlet. Some of them are musts, some are recommendations, and some are tips.
Musts
- The Storlet code must be thread safe and reenterant. The invoke method will be called many times and potentially in parallel.
- Once the storlet has finished writing the response, it is important to close the output stream. Failing to do so will result in a timeout. Specifically, close the java.io.OutputStream obtained from the call to getStreasm()
- With the current implementation, a storlet must start to respond within 40 seconds of invocation. Otherwise, Swift would timeout. Moreover, the Storlet must output something every 40 seconds so as not to timeout. This is a mechanism to ensure that the Storlet code does not get stuck. Note that outputting an empty string does not do the job in terms of resetting the 40 seconds timeout.
- For StorletObjectOutputStream, the call to setMetadata must happen before the storlet starts streaming out the output data. Note the applicability of the 40 seconds timeout here as well.
- The total size of metadata given to setMetadata (when serialized as a string) should not exceed 4096 Bytes
- While Swift uses the prefix X-Object-Meta to specify that a certain header reflects a metadata key, the key itself should not begin with that prefix. More specifically, metadata keys passed to setMetadata should not have that prefix (unless this is really part of the key)
Recommendations
- Storlets are tailored for stream processing, that is, process the input as it is read and produce output while still reading. In other words a ‘merge sort’ of the content of an object is not a good example for a storlet as it requires to read all the content into memory (random reads are not an option as the input is provided as a stream). While we currently do not employ any restrictions on the CPU usage or memory consumption of the storlet, reading large object into memory or doing very intensive computations would have impact on the overall system performance.
- While this might be obvious it is advisable to test the storlet prior to its deployment.
Tips
The storlets are executed in an open-jdk 8 environment. Thus, any dependencies that the storlet code requires which are outside of open-jdk 8 should be stated as storlet dependencies and uploaded with the storlet. Exact details are found in the deployment section below.
In some cases the Storlet may need to know the path where the storlet .jar as well as the dependencies are kept inside the Linux container. One reason may be the need to invoke a binary dependency. To get that path use the following code:
// Get the path of this class image
String strJarPath = StorletUtils.getClassFolder(this.getClass());
The Identity Storlet Example
The Identity storlet is written to work with both PUT and GET invocations
- During PUT it will place the data and metadata as uploaded by the user.
- During GET it will return the data and metadata as stored in the system.
The Storlet has two optional inputs:
- An integer controlling the chunk size at which data is copied from source to destination.
- A Boolean controlling whether the Storlet would invoke an executable. This demonstrates an executable dependency.
The identity storlet code can be found under StorletSamples.
How to Deploy a Storlet
In this paragraph we cover:
- The principles behind storlet deployment, plus examples.
- A Swift client example for uploading a storlet.
- A python example for uploading a storlet.
Storlet Deployment Principles
The compiled class that implements the storlet needs to be wrapped in a .jar. This jar must not include the SCommon.jar. Any jars that the class implementation is dependent on should be uploaded as separate jars as shown in the deployment section below.
Storlet deployment is essentially uploading the storlet and its dependencies to designated containers in the account we are working with. While a storlet and a dependency are regular Swift objects, they must carry some metadata used by the storlet engine. When a storlet is first executed, the engine fetches the necessary objects from Swift and puts them is a directory accessible by the Docker container. Note that the dependencies are meant to be small. Having a large list of dependencies or a very large dependency may result in a timeout on the first attempt to execute a storlet. If this happens, just re-send the request again.
We consider two types of dependencies: libraries and executables. libraries would typically be .jar files the storlet code is dependent on. Alternatively, one can have a binary dependency, that the storlet code can execute.
Following the Identity storlet example, we have 2 objects to upload:
The storlet packaged in a .jar. In our case the jar was named: identitystorlet-1.0.jar The jar needs to be uploaded to a container named storlet. The name of the uploaded storlet must be of the form <name>-<version>. The metadata that must accompany a storlet is as follows:
X-Object-Meta-Storlet-Language - currently must be 'java'
X-Object-Meta-Storlet-Interface-Version - currenltly we have a single version '1.0'
X-Object-Meta-Storlet-Dependency - A comma separated list of dependencies. In our case: 'get42'
X-Object-Meta-Storlet-Object-Metadata - Currently, not in use, but must appear. Use the value 'no'
X-Object-Meta-Storlet-Main - The name of the class that implements the IStorlet API. In our case: 'com.ibm.storlet.identity.IdentityStorlet'
The binary file that the storlet code is dependent on. In our case it is a binary called get42. The binary should be uploaded to a container named dependency. The dependency metadata fields appear below. Note the permissions header. This header is required so that the engine will chmod it accordingly when placed in the container so that the storlet would be able to execute it.
X-Object-Meta-Storlet-Dependency-Version - While the engine currently does not parse this header, it must appear.
X-Object-Meta-Storlet-Dependency-Permissions - An optional metadata field, where the user can state the permissions
  given to the dependency when it is copied to the Linux container. This is helpful for binary dependencies invoked by the
  storlet. For a binary dependency once can specify: '0755'
If one wishes to update the storlet just upload again, the engine would recognize the update and bring the updated code.
Important: Currently, dependency updates are not recognized, only the Storlet code itself can be updated.
Deploying a Storlet using Swift Client
When using the Swift client one needs to provide the credentials, as well as the authentication URI. The credentials can be supplied either via environment variables or via command line parameters. To make the commands more readable I have used environment variables:
export OS_USERNAME=swift
export OS_PASSWORD=passw0rd
export OS_TENANT_NAME=service
export OS_AUTH_URL=http://127.0.0.1:35357/v2.0
Here is the Swift client command for uploading the storlet. some notes:
- We use the upload option of the swift cli.
- The container name is the first parameter for the upload command and is ‘storlet’
- The name of the object and the local file to upload is ‘identitystorelt-1.0-jar’ IMPORTANT: when uploading the file from another directory, that parameter would be something of the form ‘bin/identitystorelt-1.0-jar’ in this case the name of the object appearing in the storlet container would be ‘bin/identitystorelt-1.0-jar’ which will not work for the engine.
- The metadata that needs to accompany the storlet object is provided as headers.
eranr@lnx-ccs8:~/workspace/Storlets/StorletSamples/IdentityStorlet/bin$ swift upload storlet identitystorlet-1.0.jar \
-H "X-Object-Meta-Storlet-Language:Java" \
-H "X-Object-Meta-Storlet-Interface-Version:1.0" \
-H "X-Object-Meta-Storlet-Object-Metadata:no" \
-H "X-Object-Meta-Storlet-Main:com.ibm.storlet.identity.IdentityStorlet" \
-H "X-Object-Meta-Storlet-Dependency:get42"
Here is the Swift client command for uploading the get42 dependency. Again, some notes:
- The container name used here is the first parameter for the upload command and is ‘dependency’.
- We use the optional permissions header as this is a binary .
eranr@lnx-ccs8:~/workspace/Storlets/StorletSamples/IdentityStorlet/bin$ swift upload dependency get42 \
-H "X-Object-Meta-Storlet-Dependency-Version:1.0" \
-H "X-Object-Meta-Storlet-Dependency-Permissions:0755"
Deploying a Storlet with Python
Here is a code snippet that uploads both the storlet as well as the dependencies. The code assumes v2 authentication, and was tested against a Swift cluster with:
- Keystone configured with a ‘service’ account, having a user ‘swift’ whose password is ‘passw0rd’
- Under the service account there are already ‘storlet’, ‘dependency’, and ‘storletlog’ containers.
from swiftclient import client as c

def put_storlet_object(url, token, storlet_name, local_path_to_storlet, main_class_name, dependencies):
    # Delete previous storlet
    resp = dict()

    metadata = {'X-Object-Meta-Storlet-Language':'Java',
                'X-Object-Meta-Storlet-Interface-Version':'1.0',
                'X-Object-Meta-Storlet-Dependency': dependencies,
                'X-Object-Meta-Storlet-Object-Metadata':'no',
                'X-Object-Meta-Storlet-Main': main_class_name}
    f = open('%s/%s' % (local_path_to_storlet, storlet_name), 'r')
    content_length = None
    response = dict()
    c.put_object(url, token, 'storlet', storlet_name, f,
                 content_length, None, None, "application/octet-stream", metadata, None, None, None, response)
    print response
    f.close()

def put_storlet_dependency(url, token, dependency_name, local_path_to_dependency):
    metadata = {'X-Object-Meta-Storlet-Dependency-Version': '1'}
    # for an executable dependency
    # metadata['X-Object-Meta-Storlet-Dependency-Permissions'] = '0755'
    f = open('%s/%s'% (local_path_to_dependency, dependency_name), 'r')
    content_length = None
    response = dict()
    c.put_object(url, token, 'dependency', dependency_name, f,
                 content_length, None, None, "application/octet-stream", metadata, None, None, None, response)
    print response
    f.close()
    status = response.get('status')
    assert (status == 200 or status == 201)

AUTH_IP = '127.0.0.1'
AUTH_PORT = '5000'
ACCOUNT = 'service'
USER_NAME = 'swift'
PASSWORD = 'passw0rd'
os_options = {'tenant_name': ACCOUNT}

url, token = c.get_auth("http://" + AUTH_IP + ":" + AUTH_PORT + "/v2.0", ACCOUNT +":"+USER_NAME, PASSWORD, os_options = os_options, auth_version="2.0")
put_storlet_object(url, token,'identitystorlet-1.0.jar','/tmp' ,'com.ibm.storlet.identity.IdentityStorlet', 'get42')
put_storlet_dependency(url, token,'get42','/tmp')